![]()
This example illustrates how to expand and contract the clipping region of a layer, without changing the wrapping width of the layer. (The next example, Chapter 13, "Changing Wrapping Width Example,", illustrates how to capture mouse events so that the user can make a layer's wrapping width wider or narrower by dragging the mouse.)
This example illustrate these tasks:
onLoad and onMouseOver event handlers for layers
The sections in this chapter are:
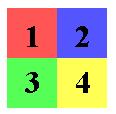
In this example, when the page initially loads, the user sees four colored squares as follows:

When the square is fully contracted, it displays a number. If the user moves the mouse over one of the squares, its content changes to a block of text and the square expands.The top-left square expands up and to the left, the top-right square expands to the top and to the right, and so on.
The following figure shows the four squares after the top-left and top-right squares are fully expanded.

While a square is expanding, further mouse-over events are blocked on that square until it has finished expanding. When it is fully expanded, if the user moves the mouse over it, then it contracts again. While it is contracting, all mouse-over events for that square are blocked until it has finished contracting. When it finishes contracting, it changes its content back to a number.
To run the example see:
squares.htm
This example is provided only as a To view the complete code for the example, use the <LAYER> version.Page Source command of the View menu in the Navigator browser that is displaying the example.
Each colored square is in its own layer. The width of each layer is 200 and the height is 200. When the page loads you only see a 50x50 region of each layer because as soon as it is loaded, it calls a function that sets its clipping region so that only a small part of the square is visible.
Each square layer contains another layer that displays a number. The number needs to be in a layer so that can be placed it in the portion of the layer that is visible when the square is fully contracted.
The following figure shows where the number 1 would appear in the top-left square if it were not in a layer but were allowed to fall in its natural position in the parent layer. As you can see, when the red square is fully contracted, the number would not be visible.

The following code defines the top-left layer:
<LAYER ID="topleftblock" top=50 left=50
width=200 height=200
BGcolor="#FF5555"
onLoad = initializeTopLeft(0);
onMouseOver=changeNow(0); >
<LAYER TOP=160 LEFT=168>
<H1>1</H1>
</LAYER>
</LAYER>
This layer would be 200 pixels wide by 200 high. However, when this layer finishes loading, it calls its onLoad function, initializeTopLeft().
Before considering the initializeTopLeft() function, quickly look at the global variables defined in the script. There are four variables that describe the minimum and maximum clipping values. The variable delta specifies the distance by which the clipping values change each time the expand() or contract() functions are called. (These functions will be discussed in detail soon.)
<SCRIPT>
var maxclip = 200;
var minclip = 0;
var maxclipcontracted = 150;
var minclipcontracted = 50;
var delta = 10;
The initializeTopLeft() function does the following things:
"waitingToExpand". (Notice that you can create the variable simply by using it.)
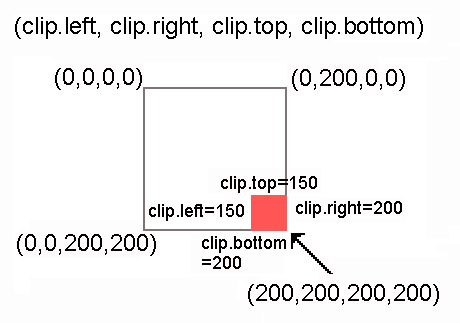
clip.top, clip.bottom, clip.right, and clip.left values so that the visible region of the layer is a square measuring 50 pixels by 50 pixels in the bottom right corner, as illustrated in the following figure:

dleft, dtop, dbottom, and dright variables to indicate by how much the clip.left, clip.top, clip.bottom and clip.right variables need to change while the square is expanding.
myposition variable to topLeft.
mysource variable so that it specifies the source file to be used as the contents of the layer when it starts expanding.
mytext variable so it contains the text that will be written to the layer when the layer is fully contracted.
The full definition for the initializeTopLeft() function is shown here:
function initializeTopLeft(n)
{
var thislayer = document.layers[n];
thislayer.status = "waitingToExpand";
thislayer.clip.top = maxclipcontracted;
thislayer.clip.left = maxclipcontracted;
thislayer.clip.bottom = maxclip;
thislayer.clip.right = maxclip;
thislayer.dleft = -delta;
thislayer.dtop = -delta;
thislayer.dbottom = 0;
thislayer.dright = 0;
thislayer.myposition = "topLeft";
thislayer.mysource="point1.htm"
thislayer.mytext="<LAYER TOP=160 LEFT=168><H1>1</H1></LAYER>"
return false;
}
Each of the other three layers has a similar definition, and a corresponding initialization function.
Since the bottom squares can be dynamically expanded beyond the height of the page, add a last layer that is positioned below the bottom of the expanded bottom squares. This last layer has nothing in it, but it forces the Web page to increase its height to be big enough to include the expanded layers. Thus you will be able to use the scrollbar to scroll down to the bottom of the expanded layers if they do not initially fit on your screen.
If you we do not include this last layer, then the scrollbar will only allow you to scroll to the bottom of the contracted squares.
Here is the definition for the last layer:
<LAYER TOP=500>
<P></P>
</LAYER>
When you move the mouse over any of the colored squares, its changeNow() function is invoked. (This is because in the layer definition, the onMouseOver handler is set to changeNow().)
The basic aim of the changeNow() function is to start expanding the layer if it is fully contracted, or start contracting the layer if it is fully expanded. If the layer is already in the process of expanding or contracting, it ignores the new mouse over event.
The status variable indicates whether the layer is waiting to expand, waiting to contract, expanding or contracting. The status value for each layer is initialized to "waitingToExpand".
The changeNow() function simply checks the status of the layer and then calls the expand() function, the contract() function, or does nothing, depending on the layer's status. If the layer needs to start expanding, it first sets the layer's source to change the content of the layer to show text instead of just a number.
function changeNow (n)
{
var thislayer = document.layers[n];
if (thislayer.status == "waitingToExpand")
{
thislayer.src=thislayer.mysource;
expand(n);
}
else if (thislayer.status == "waitingToContract")
{contract(n);}
return false;
}
The expand() function sets the layer's status to expanding. Then it changes each of the clip.left, clip.right, clip.top, and clip.bottom variables by the values appropriate to the particular layer to increase the layer's visible region in the appropriate direction. It then checks if the layer is fully expanded and, if not, calls the setTimeout() function to reinvoke the expand() function.
If the layer has finished expanding, the expand() function sets the layer's status to "waitingToContract".
Here is the code for the expand() function:
function expand (n)
{
var thislayer = document.layers[n];
thislayer.status = "expanding";
// increase or decrease each clip value as appropriate
thislayer.clip.left=thislayer.clip.left+thislayer.dleft;
thislayer.clip.right=thislayer.clip.right+thislayer.dright;
thislayer.clip.bottom=thislayer.clip.bottom+thislayer.dbottom;
thislayer.clip.top=thislayer.clip.top+thislayer.dtop;
// is the layer fully expanded?
if (
(((thislayer.myposition == "topLeft") |
(thislayer.myposition == "bottomLeft")) &&
(thislayer.clip.left > minclip)) ||
(((thislayer.myposition == "topRight") |
(thislayer.myposition == "bottomRight")) &&
(thislayer.clip.right < maxclip)))
// if not, call expand again
{setTimeout("expand(" + n + ")", 50);}
// if so, change the layer's status
else {thislayer.status = "waitingToContract";}
return false;
}
The contract() function is very similar to the expand() function. The contract() function sets the layer's status to contracting. Then it changes each of the clip.left, clip.right, clip.top, and clip.bottom by the values appropriate to the particular layer to decrease the visible region in the appropriate direction. It then checks if the layer is fully contracted, and if not, calls the setTimeout() function to reinvoke the contract() function.
If the layer has finished contracting, the contract() function sets the layer's status to "waitingToExpand". The other thing it does is to change the contents of the layer so that you can see the number of the layer. It does this by opening the layer's document, writing the data stored in the layer's mytext variable, and then closing the layer's document.
The value of the mytext variable was set during the initialization process. For each layer, it contains the HTML text for an embedded layer that displays the layer's number at a place that will be visible when the layer is fully contracted.
Here is the code for the contract() function:
function contract (n)
{
var thislayer = document.layers[n];
thislayer.status = "contracting";
// increase or decrease each clip value as appropriate
thislayer.clip.left=thislayer.clip.left-thislayer.dleft;
thislayer.clip.right=thislayer.clip.right-thislayer.dright;
thislayer.clip.bottom=thislayer.clip.bottom-thislayer.dbottom;
thislayer.clip.top=thislayer.clip.top-thislayer.dtop;
// is the layer fully contracted? True if
// the square is the top OR bottom left AND its clip left
// is less than or equal to the minimum clip for contracted squares
// OR if the square is the top OR bottom right AND its clip right
// is greater than or equal the max clip for contracted squares
if (
(((thislayer.myposition == "topLeft") |
(thislayer.myposition == "bottomLeft")) &&
(thislayer.clip.left <= minclipcontracted)) ||
(((thislayer.myposition == "topRight") |
(thislayer.myposition == "bottomRight")) &&
(thislayer.clip.right >= maxclipcontracted)))
// if not, call contract again
{setTimeout("contract(" + n + ")", 50);}
// if it is fully contracted
else {
// change the status
thislayer.status = "waitingToExpand";
//open the document, write mytext to it, close again
thislayer.document.write(thislayer.mytext);
thislayer.document.close();
}
return false;
}
</SCRIPT>
Just to make the text in the squares look prettier, this file uses a style sheet to set left and right margins for paragraphs, and to center level-three headings:
<STYLE TYPE="text/css">
<!--
P {margin-left:10%; margin-right:10%;}
H3 {text-align:center; margin-top:4%;}
-->
</STYLE>
Last Updated: 08/07/97 15:21:59